Color Calibration

By | Custom Prints | No Comments

Have you ever had your design set to just the perfect color on your screen, but when you went to print it came out different than what you see on the screen? There are many different factors that play a role in the color variation from screen to print out. One of the most dominant factors in the color change is the conversion from RGB to CMYK.


RGB stands for Red, Green, & Blue color variations, which is what monitors use to display color. CMYK stands for Cyan, Magenta, Yellow, & Black color scheme, which is what printers use. As shown below, you can see how the different colors models are depicted.
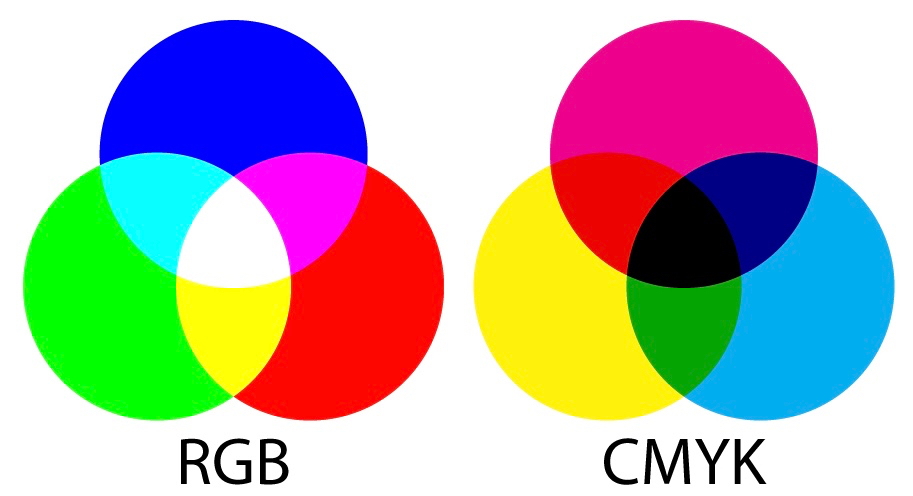
RGB: Red, Green, Blue CMYK: Cyan, Magenta, Yellow, Black
  • Additive color model
  • For computer displays
  • Uses light to display color
  • Colors result from transmitted light
  • Subtractive color model
  • For printed material
  • Uses ink to display color
  • Colors result from reflected light
Red + Green + Blue = White Cyan + Magenta + Yellow = Black


In addition to the color model difference between your display and prints, there are some other factors that could be affecting your color. A few of those reasons are:


  • Ink Layering & Overlapping – This causes subtle shifts in the colors that you don’t find happening in the pixels that make up your screen image.
  • Saturation & Contrast – Prints don’t have the same level of saturation and contrast that a monitor has. Prints are typically darker and less vibrant than what is shown on your display. Paper texture can affect the level of brightness, making a big difference in your results.
  • White-Point Mismatch – This means that the white color on your paper isn’t the same white color you see on your screen. The majority of the time you’ll see the difference is quite obvious.


What can you do about this issue?

Now that we’ve explained a bit about the reasons for the color differences from monitor to paper, we’re going to talk about what can be done.


#1 – One of the first things to check is the calibration of your monitor’s color settings, as well as any drivers that may be needed to support the display properly. Next, you should confirm that you have properly installed the correct drivers for your printer as well. Within your printer driver settings, you’ll find controls for fine-tuning the overall appearance of the color output. Depending on what you’re looking to get, this may be sufficient.


#2 – If you are particular about your colors and need them as accurate as possible, a common solution is visiting your local printing service. Commercial printing companies deal with this issue on a regular basis and have the solutions you need at an affordable cost.


#3 – Often printers come with a Pantone Color Bridge swatch book that can be used as a reference to match colors as closely as possible to your desired color. This color bridge will show you the Pantone ink colors right next to its closest match in the CMYK digital printing spectrum.


We hope this article was useful in helping you determine what the issue may be in your color differences from screen to prints. Whether you’re creating business cards, logo designs, celebratory invitations, or whatever else it may be, we wish you the best in your creativity and designs!

This article was written by SaltLakePrinting.com

Properly Scanning Film Negatives

By | FIlm Scanning, Large Format Film Scanning, Medium Format Film Scanning | 2 Comments

Cleaning and Preparing


Even after development a film negative still has a very fragile nature. Whether a film negative was well taken care of throughout it’s life or it was tossed around like a napkin, there are certain things we can do to diminish the look of wear and tear on a negative. One of the biggest threats to a negative is scratching. This is because there is no way to get back the information that is scraped off when a negative is scratched. Another issue is simply dust. It may seem like a very easy pest to get rid of but dust can dull and distort an image. The proper way to remove dust without causing any wear or scratching on the film is to use compressed air. Occasionally other issues arise with a film negative in which case further steps can be taken to clean and prepare the film before scanning.


Holding The Negative In Place


Once the negative has been prepped and cleaned it is time to carefully position it to be scanned. This processes involves film holder that are specifically designed for each film size and shape. The film holder is just large enough to hold the edges of the film flat without blocking any of the image area. Film naturally wants to curve but this would result in an out of focus image. The film holder also suspended the negative between the bottom and top glass panels of the scanner to ensure that both the negative and scanning bed will remain as clean as possible.


Lights, Camera, Action


The remaining tasks of the negative scanning process are taken care of on the computer. This is where we tell the scanner how much to expose the negative. Unlike an ordinary photograph, a negative is translucent so it is very sensitive to the amount of light coming in from the bottom and the top of the scanner. This exposure will determine how much information we get from the negative in terms of highlights, mid-tones and shadows. An ideal scan will balance the amount of light correctly to get as much information as possible from the negative without losing highlights or shadows by over or under exposing the negative. Once the scan has been taken the image file is then edited and then finally exported.

The Difference Between 8mm and Super 8

By | 8mm Film, FIlm Scanning, Uncategorized | No Comments

The Difference a Sprocket Makes

To the naked eye the difference between 8 mm film and Super 8 mm are simply that the sprocket on Super 8 are smaller and square rather than rectangular. A common misconception is that Super 8 is actually a different size film than 8mm but this isn’t true; both film formats are both 8mm in width. By shrinking the sprocket size Super 8 film is able to accommodate a larger frame size within the same 8mm film width. This difference may seem like a small change but the sprocket size of 8mm film was limiting the possibilities for innovation.

Frame Size Improvements

The image quality of any given film format is determined primarily by the size of the film frame. The larger the frame the more information each frame can hold. Standard 8mm film could only accommodate a 4.5mm by 3.3mm frame because of the room taken up by the sprockets. Super 8 improved on the frame size by a great deal within the same overall film size. The super 8 frame size grew to 5.79mm by 4.01 which is a 26% increase in image area.

Super 8 Merges Audio With Video

In addition, Super 8 film incorporated a magnetic sound strip that could record audio similar to the way a tape machine does. This advancement made the Super 8 film an immediate favorite for family and hobbyists for many decades. Recovering the Super 8 audio is a tricky process that involves taking photos of the sound waves recorded to the magnetic strip and converting those waves into actual sound files. This technology is still very early in its development. Even after VHS tape cassettes had taken over the entry level camera market in the 80’s people still continued to use Super 8 film for the unique character that was innate in the film format.
Roots Family History New York City Film Scanning 8mm 16mm

Film Degradation – Vinegar Syndrome

By | 16mm Film, 8mm Film, FIlm Scanning | No Comments

Better to Degrade than to Ignite

The film that our home videos are stored on is almost always cellulose based Safety Film. This is the non flammable film stock that was created after too many Nitrate based film reels caught on fire. The problem with the Cellulose Acetate Plastic is that is not the most stable material to store images on and over time it falls victim to Acetate Film Base Degradation. This process is known as Vinegar Syndrome because of the acetic acid (vinegar) that is created when this degradation occurs.

Difficulties Converting

The unfriendly smell really wouldn’t be so bad if it didn’t also destroy precious memories and cinematic history. The physical state of the film changes so much that it can become impossible for the film to pass through any video equipment without breaking. This is largely due to shrinkage of the film in length and width and the loss of flexibility. Once the film is bent it usually wants to buckle or break due to a curvature along the width of the film. If an image can be pulled from the film it could likely be shrunken down, partially out of focus and erratically shaky.

Preserve and Protect

This process takes a long time to occur and can be postponed with cool, dry storage conditions. Regions of the world that have higher temperatures and humidity have a much greater problem with vinegar syndrome than others. Once this process has been detected it is best to get the film to a preservationist as soon as possible to make sure that the film can be digitized before the condition worsens.

From Feature Film to Home Video

By | Uncategorized | No Comments

First Photography, Then Video

The story of film follows one central character and the company he started; George Eastman and the Eastman Kodak Company. Much like Henry Ford with the automobile, George Eastman didn’t invent the camera but he did invent a new form of photography that made it accessible to the masses. His 1888 invention of the Kodak camera presented the fundamental idea of roll film to the world and this same concept is what eventually brought us film video. With each release of a Kodak camera the world of photography became less and less about expensive chemicals, bulky equipment and years of training and more about an image making process that anyone could enjoy.

From 35mm to 16mm

As Photography entered the world and began improving upon itself, motions pictures were soon to follow. The first film video camera was invented in 1890 and technological advancements were being made soon after. Although motion pictures captivated the world, it was an art form that was not accessible to the common person at all. It was almost 40 years before sound would be put to video and during most of that time everything was shot on 35mm film reels. Shooting, Developing, Editing and Showing a video was a gigantic undertaking with 35mm film but in 1923 George Eastman once again revolutionized the industry by introducing 16mm film with the Cine Kodak camera. This camera was only 7 pounds and about 8 inches square but because it had to be hand cranked the operator still needed a tripod to use it. About a decade later he released the 8mm format which was again an improvement in affordability and usability.

8mm to Digital

Through the 1940’s and 50’s 8mm cameras were making there way into the family home of many Americans. By this point in time the cost had lowered to the point where the average middle class american could afford a camera, some rolls of film and a projector to watch them on. Most videos were recorded at family events or special occasions. 8mm video became the standard for many decades until digital inevitably took hold as the predominant means for recording home video.


Our Film Scanning Process

By | 16mm Film, 8mm Film, FIlm Scanning | No Comments

Family History First 

The biggest difference between Roots Family History and every other company that can scan your film is that we are a Family History Company and not a Scanning Company. This means that we are invested in helping you discover your family history. Our process of scanning film incorporates organizational skills and the highest quality standards to ensure that your memories are crystal clear and easily accessible.

Capturing Every Frame

When scanning home movies we are usually dealing with film that was shot by amateur videographers and often times the focus or exposure may not be quite right. We make sure that we compensate for these factors as best we can when scanning the film. This means we take extra time with each roll to find what the optimum exposure is. Many film scanning methods can unintentionally crop the frame of the film which means that you get back a video that isn’t showing the full imagery. Our process eliminates that problem so you always see the full picture in high resolution. 

Organizing Memories

In the digital age we all know what it feels like to be overwhelmed with digital clutter. Unorganized files take up space and become more trouble than they are worth. We carefully follow each reel from pickup to drop off and make sure that any information that is attached to that reel will be attached to the file that we hand back to you. We create a new file for every film reel so your digital organization can match the organization of your film. 

What is Frame by Frame Film Scanning?

By | 16mm Film, 8mm Film, FIlm Scanning | No Comments

Many Frames | One Reel

Sometimes it’s easy to forget that every video or movie we’ve watched is actually a series of images that are flashed before us at high speeds. It takes over a thousand frames each minute to create the illusion of movement and make these still images appear as a video. When digitizing a reel of film the only way to truly capture all the quality of this analog media is to scan each and every frame. This is the process of Frame by Frame scanning.

Improper Film Scanning

The inferior way of scanning film is to use an old projector to display the video on a wall and film the wall with a digital camera. The resulting video is likely to have improper exposure, unwanted cropping and a number of other imperfections. This wall filming method is called Telecine and it is the cheapest way to digitize film but will never recreate the quality and liveliness that a film reel has.

Capturing Every Single Frame

Frame by frame scanning requires a state of the art machine that can locate and capture a photo of every frame on a reel of film. This ensures no detail will be lost between frames and all the detail of every image will be the highest possible quality. Taking separate images of every frame requires more time for the film to be scanned but eliminates focusing and cropping errors that occur with other methods. The series of images that is created when a reel is scanned is then imported into a video editing program where it is made into a video.